

For a while, I’ve wanted to start a blog to share my ideas and try to articulate what I’ve learned. Before this iteration of the blog, I tried using a template YAML file within JavaScript to create blog posts. This approach was terrible; it was hard to see any syntax or even format it properly afterward. Sometimes, it’s better to use already developed tools and techniques. That’s where I found an amazing video by NetworkChuck about setting up a content pipeline using Obsidian to create the Markdown files for a blog, and using a templater such as Hugo to turn them into pretty webpages like the one you are reading now. In this post, I will go over the steps I took to create this blog, and hopefully inspire you to create one as it’s so easy to achieve.
Setting up Obsidian#
The first thing we will do is install Obsidian and set up our blog posts directory. Obsidian is a note-taking and organisation tool that I’ve started to love using. You can organise markdown notes and content in folders to create a “second brain.” There are tools to set up personalised daily notes so you can track habits and create diaries. This content is synced between devices on your account as well. Download the app from https://obsidian.md/ and go through the setup.
After you have setup Obsidian:
- Create a new folder where you will put all you blog posts, I labelled mine “posts”.
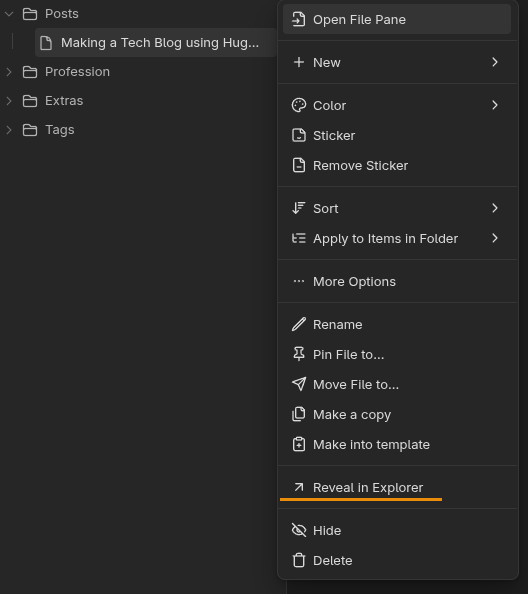
- You can start to write your posts in this directory, all you need now is the path to the directory. Right click the folder and select “reveal in explorer”. Keep a note of this path as we will need it later.
In order for the blog to have a title and tags we need to set some properties, all you need to add to the top of your document is.
---
title: Making a Tech Blog using Hugo and Obsidian
date: 2025-10-06
draft: false
tags:
  - tag1
  - tag2
---
Setting up Hugo#
Firstly, install Git (https://github.com/git-guides/install-git) and Go (https://go.dev/dl/) and follow the steps to install for your system at https://gohugo.io/installation/. The installation is simple for Linux, as you can install it with your package manager. After everything is installed, you can start creating your website.
## Verify Hugo works
hugo version

## Create a new site

hugo new site sitename
cd sitename
Update “sitename” with the project name. Next, you need to theme your site. My site uses Blowfish as a theme (https://blowfish.page/); however, an entire list of themes can be found here: https://themes.gohugo.io/. Follow the instructions to install the theme in your Hugo site. The easiest way is to use a Git submodule, however. WARNING: These commands will differ depending on the theme; follow the instructions on the theme page.
## Initialize a git repository (Make sure you are in your Hugo website directory)

git init

## Set global username and email parameters for git

git config --global user.name "Your Name"
git config --global user.email "your.email@example.com"


## Install a theme (we are installing the Blowfish theme here)
## Find a theme ---> https://themes.gohugo.io/

git submodule add -b main https://github.com/nunocoracao/blowfish.git themes/blowfish

## Delete the hugo generated config and copy the blowfish configs into config/_default
mkdir config/_default
cp themes/blowfish/config/_default/* config/_default/
rm hugo.toml
You can go through and update the config so you site looks how you want it to. After you’ve configured your site you can now test it with:
## Verify Hugo works with your theme by running this command

hugo server -t themename
Getting content on your site#
All your content for the website lives in the “content” folder. If you have different pages, you need a corresponding folder within the content directory. For our blog posts, we will create a directory called “posts” in the content folder and copy our content from Obsidian into this folder.
For Windows use:
robocopy sourcepath destination path /mir
For Mac/Linux use:
rsync -av --delete "sourcepath" "destinationpath"
Finally, to add images to these posts, we will use a script made by NetworkCheck. He explains it in his video, which I highly recommend watching as a follow-along. Make sure you have the correct paths to your own Obsidian Vault and Hugo site. These are Python scripts, so make sure you have Python installed to run them.
For Windows:
import os
import re
import shutil
# Paths (using raw strings to handle Windows backslashes correctly)
posts_dir = r"C:\Users\chuck\Documents\chuckblog\content\posts"
attachments_dir = r"C:\Users\chuck\Documents\my_second_brain\neotokos\Attachments"
static_images_dir = r"C:\Users\chuck\Documents\chuckblog\static\images"
# Step 1: Process each markdown file in the posts directory
for filename in os.listdir(posts_dir):
if filename.endswith(".md"):
filepath = os.path.join(posts_dir, filename)
with open(filepath, "r", encoding="utf-8") as file:
content = file.read()
# Step 2: Find all image links in the format 
images = re.findall(r'\[\[([^]]*\.png)\]\]', content)
# Step 3: Replace image links and ensure URLs are correctly formatted
for image in images:
# Prepare the Markdown-compatible link with %20 replacing spaces
markdown_image = f"})"
content = content.replace(f"[[{image}]]", markdown_image)
# Step 4: Copy the image to the Hugo static/images directory if it exists
image_source = os.path.join(attachments_dir, image)
if os.path.exists(image_source):
shutil.copy(image_source, static_images_dir)
# Step 5: Write the updated content back to the markdown file
with open(filepath, "w", encoding="utf-8") as file:
file.write(content)
print("Markdown files processed and images copied successfully.")
And for Mac/Linux
import os
import re
import shutil
# Paths
posts_dir = "/Users/networkchuck/Documents/chuckblog/content/posts/"
attachments_dir = "/Users/networkchuck/Documents/neotokos/Attachments/"
static_images_dir = "/Users/networkchuck/Documents/chuckblog/static/images/"
# Step 1: Process each markdown file in the posts directory
for filename in os.listdir(posts_dir):
if filename.endswith(".md"):
filepath = os.path.join(posts_dir, filename)
with open(filepath, "r") as file:
content = file.read()
# Step 2: Find all image links in the format 
images = re.findall(r'\[\[([^]]*\.png)\]\]', content)
# Step 3: Replace image links and ensure URLs are correctly formatted
for image in images:
# Prepare the Markdown-compatible link with %20 replacing spaces
markdown_image = f"})"
content = content.replace(f"[[{image}]]", markdown_image)
# Step 4: Copy the image to the Hugo static/images directory if it exists
image_source = os.path.join(attachments_dir, image)
if os.path.exists(image_source):
shutil.copy(image_source, static_images_dir)
# Step 5: Write the updated content back to the markdown file
with open(filepath, "w") as file:
file.write(content)
print("Markdown files processed and images copied successfully.")
Congratulations! After all these steps are done, we can run the Hugo server locally and hopefully see our formatted blog posts. This is all well and good; however, if we want anyone to be able to read these, we need to get them hosted on the internet. Luckily, GitHub has a free hosting service called “GitHub Pages.
Setting up GitHub Pages#
GitHub Pages is simple to set up. I will be following the official instructions to walk you through this (https://docs.github.com/en/pages/quickstart). First, make sure you have a GitHub account, create a repository called “your username”.github.io, and initialize the repository with a README. Next, go into the settings and navigate to the “Code and automation” section in the sidebar, then select the Pages section. From there, select Deploy from a branch under Source and choose your main branch under the branch setting. Now, any time we commit to this branch, it will update our site. Type your repository’s name in the URL bar to see if GitHub Pages has been set up correctly.

Hugo needs specific changes to work with GitHub pages (https://gohugo.io/host-and-deploy/host-on-github-pages/). In the site configuration, add the following to the end (for Blowfish its in config/_default/config.toml):
[caches]
  [caches.images]
    dir = ':cacheDir/images'
Now create a GitHub workflows directory and a configuration for deploying Hugo.
mkdir -p .github/workflows
touch .github/workflows/hugo.yaml
Copy the following config into the hugo.yaml file we just created.
name: Build and deploy
on:
  push:
    branches:
      - main
  workflow_dispatch:
permissions:
  contents: read
  pages: write
  id-token: write
concurrency:
  group: pages
  cancel-in-progress: false
defaults:
  run:
    shell: bash
jobs:
  build:
    runs-on: ubuntu-latest
    env:
      DART_SASS_VERSION: 1.93.2
      GO_VERSION: 1.25.1
      HUGO_VERSION: 0.151.0
      NODE_VERSION: 22.18.0
      TZ: Europe/Oslo
    steps:
      - name: Checkout
        uses: actions/checkout@v5
        with:
          submodules: recursive
          fetch-depth: 0
      - name: Setup Go
        uses: actions/setup-go@v5
        with:
          go-version: ${{ env.GO_VERSION }}
          cache: false
      - name: Setup Node.js
        uses: actions/setup-node@v4
        with:
          node-version: ${{ env.NODE_VERSION }}
      - name: Setup Pages
        id: pages
        uses: actions/configure-pages@v5
      - name: Create directory for user-specific executable files
        run: |
          mkdir -p "${HOME}/.local"
      - name: Install Dart Sass
        run: |
          curl -sLJO "https://github.com/sass/dart-sass/releases/download/${DART_SASS_VERSION}/dart-sass-${DART_SASS_VERSION}-linux-x64.tar.gz"
          tar -C "${HOME}/.local" -xf "dart-sass-${DART_SASS_VERSION}-linux-x64.tar.gz"
          rm "dart-sass-${DART_SASS_VERSION}-linux-x64.tar.gz"
          echo "${HOME}/.local/dart-sass" >> "${GITHUB_PATH}"
      - name: Install Hugo
        run: |
          curl -sLJO "https://github.com/gohugoio/hugo/releases/download/v${HUGO_VERSION}/hugo_extended_${HUGO_VERSION}_linux-amd64.tar.gz"
          mkdir "${HOME}/.local/hugo"
          tar -C "${HOME}/.local/hugo" -xf "hugo_extended_${HUGO_VERSION}_linux-amd64.tar.gz"
          rm "hugo_extended_${HUGO_VERSION}_linux-amd64.tar.gz"
          echo "${HOME}/.local/hugo" >> "${GITHUB_PATH}"
      - name: Verify installations
        run: |
          echo "Dart Sass: $(sass --version)"
          echo "Go: $(go version)"
          echo "Hugo: $(hugo version)"
          echo "Node.js: $(node --version)"
      - name: Install Node.js dependencies
        run: |
          [[ -f package-lock.json || -f npm-shrinkwrap.json ]] && npm ci || true
      - name: Configure Git
        run: |
          git config core.quotepath false
      - name: Cache restore
        id: cache-restore
        uses: actions/cache/restore@v4
        with:
          path: ${{ runner.temp }}/hugo_cache
          key: hugo-${{ github.run_id }}
          restore-keys:
            hugo-
      - name: Build the site
        run: |
          hugo \
            --gc \
            --minify \
            --baseURL "${{ steps.pages.outputs.base_url }}/" \
            --cacheDir "${{ runner.temp }}/hugo_cache"
      - name: Cache save
        id: cache-save
        uses: actions/cache/save@v4
        with:
          path: ${{ runner.temp }}/hugo_cache
          key: ${{ steps.cache-restore.outputs.cache-primary-key }}
      - name: Upload artifact
        uses: actions/upload-pages-artifact@v3
        with:
          path: ./public
  deploy:
    environment:
      name: github-pages
      url: ${{ steps.deployment.outputs.page_url }}
    runs-on: ubuntu-latest
    needs: build
    steps:
      - name: Deploy to GitHub Pages
        id: deployment
        uses: actions/deploy-pages@v4
Now we can commit all our changes to the repo and the site should automatically be generated. Remember to set our repository as the remote on the Hugo project.
Results#
After you commit to the repo, you should have a Hugo site that can be updated from our Obsidian Vault. This has been my first blog post written using this pipeline, and it makes a massive difference. Not only has this been fun to write, but it’s also been incredibly easy. Automatically seeing the formatted changes gives me more freedom in some design decisions and makes storing these blog posts much easier.
I hope you’ve enjoyed setting this up and learnt a lot in the process :)